Storyboard Updates In Depth Tutorial - Part 1
In this tutorial, you will learn how your existing application project can benefit from Bounces dynamic storyboard updates.
Part 1 - Configuration and First Dynamic Edits
A first look at the PhotoAlbum project
Start by downloading the PhotoAlbum start project here, open the project in Xcode 11 or later, and run the application.
The app home screen show a list of photo albums. Tapping on an album's image shows a mosaic of the photos in this album. Tapping on a photo thumbnail in this second screen leads to a third screen displaying the photo.
All this is functional, but rather raw at this point. But don't worry, the point of this tutorial is precisely to bring improvements to this PhotoAlbum app. :)
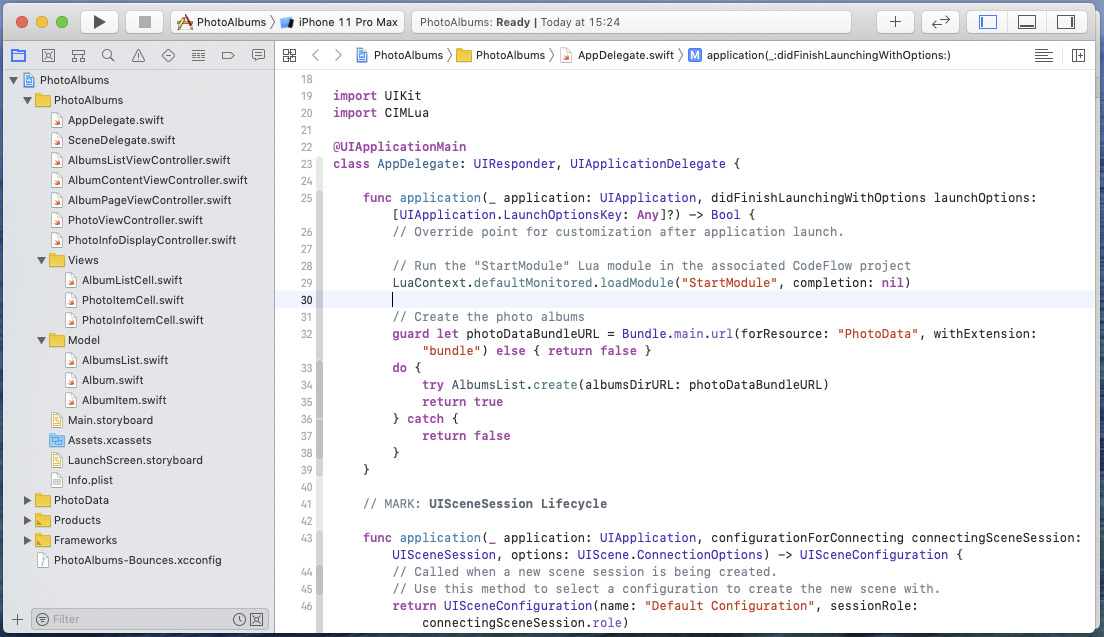
Now, display the Main storyboard and have a look at the application structure.
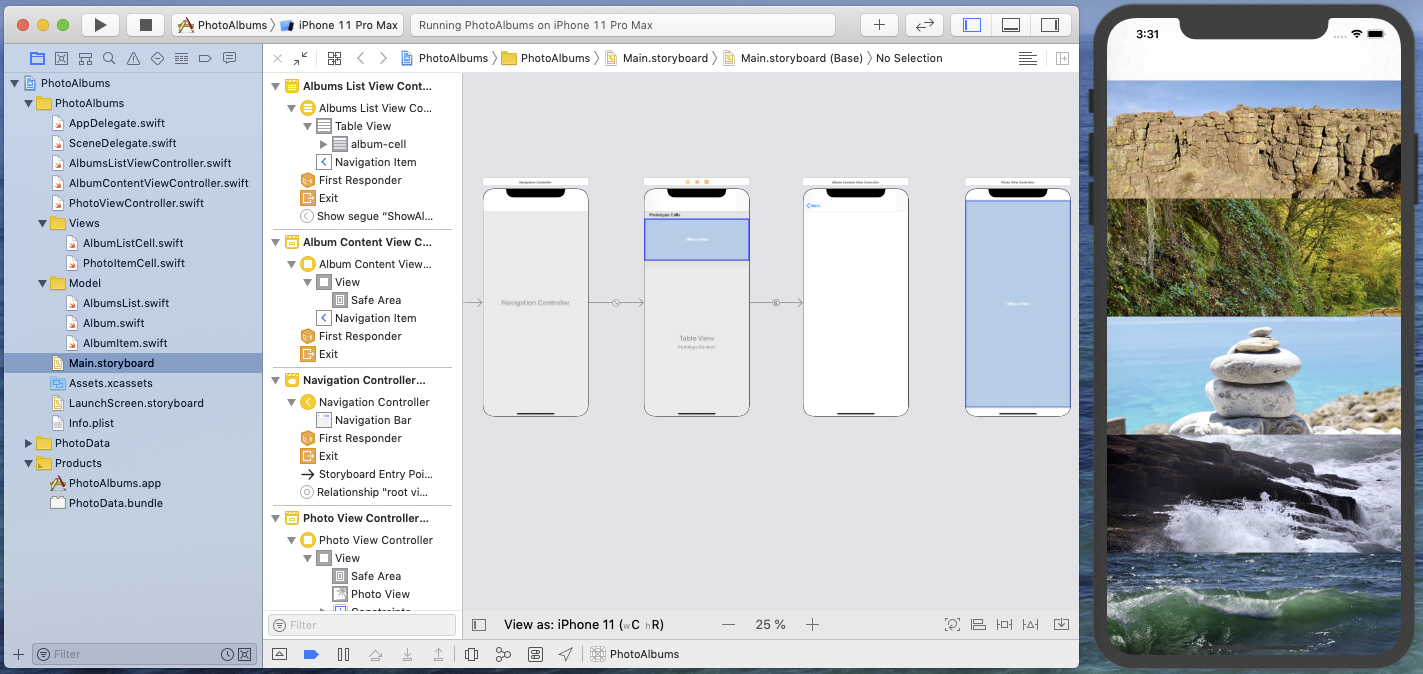
PhotoAlbum is a navigation-based app with 4 ViewControllers:
a Navigation Controller to handle the navigation;
an Albums List View Controller, that displays the list of photo albums in a UITableView;
an Album Content View Controller that shows the photos in a given album in a UICollectionView using iOS 13 compositional layout;
however, because Xcode does not provide much support for collection views in storyboards, this View Controller's view is entirely managed by code;a Photo View Controller displaying an individual photo in a UIImageView.
Configuring the project for dynamic updates
Adding dynamic updates to an existing application project is a matter of three easy steps:
- Create an empty project in Bounces and associate it with the Xcode application target;
- Set dynamically-updated storyboards and view controllers;
- Add one line of code in your app delegate to load the Bounces project start module in the application.
Let's do this on the PhotoAlbum app.
Create an empty Bounces project and associate it with the PhotoAlbum app
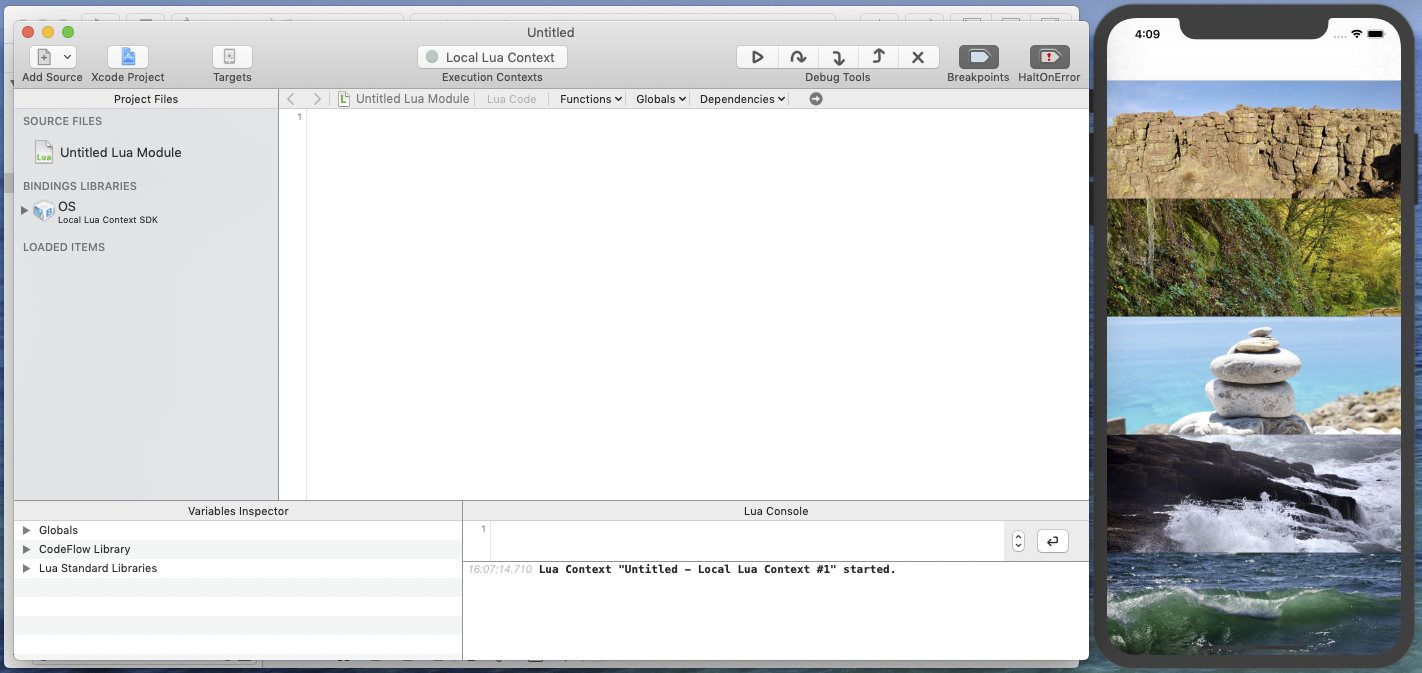
Create an empty project in Bounces by selecting New Project in the File menu or by pressing cmd-N. You get an empty project containing a single Untitled Lua module (the project is currently running in a local Lua context but you will change that in a few seconds).
Click in the Xcode Project button in the project window toolbar and select the PhotoAlbum Xcode project as associated Xcode project.
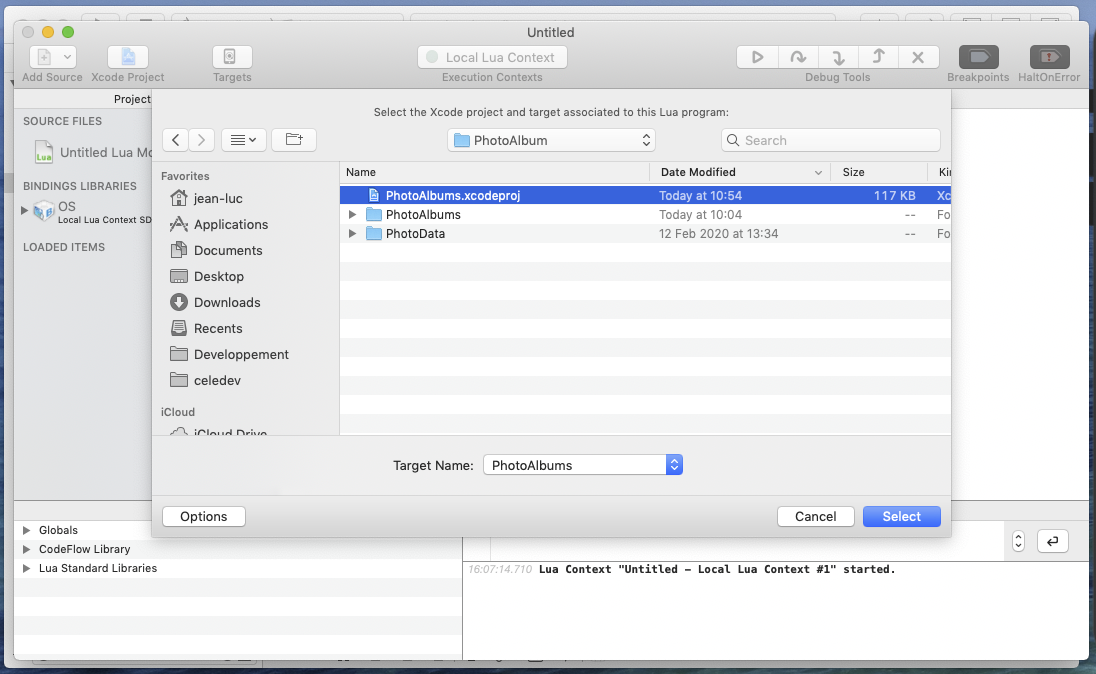
Check that the Xcode target is PhotoAlbum, and validate by clicking on Select. The Xcode project association configuration interface is presented.
You can notice slight changes in the project window behind the configuration sheet: the Bindings Libraries section in the project files list now contains the current iOS SDK bindings (the target application runs on iOS) and a Xcode-target-specific bindings library for the PhotoAlbum application; also, the local Lua context has been removed and the Execution Contexts item in the toolbar indicates that no target execution context is currently connected.
Set dynamically-updated view controllers
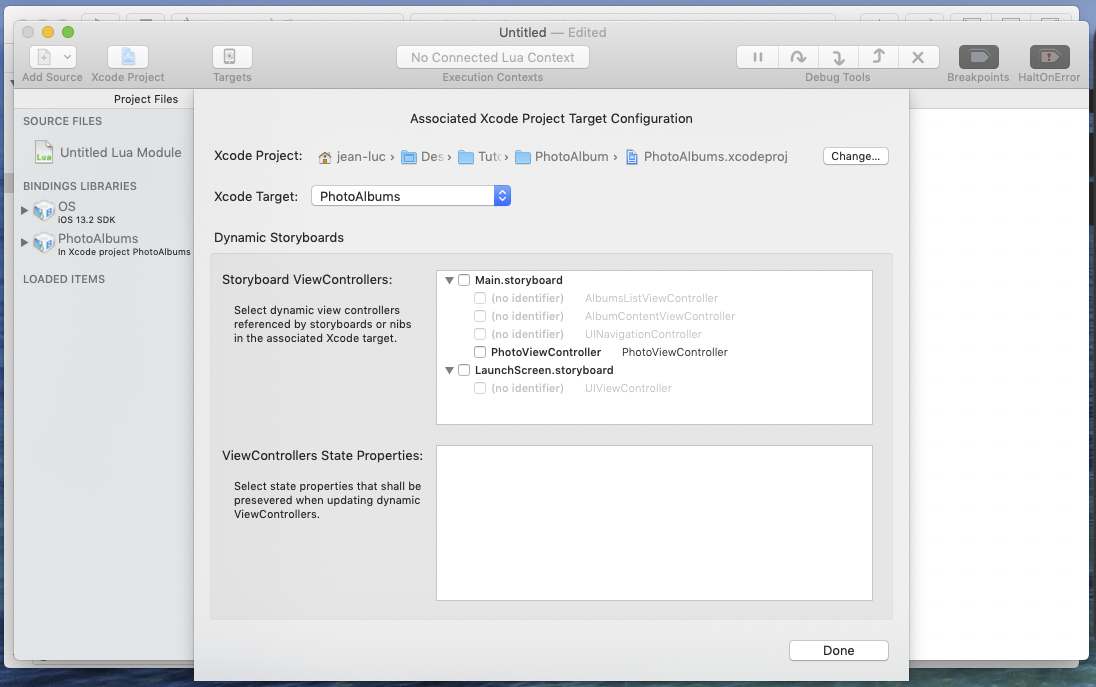
Now that the new Bounces project is associated with the PhotoAlbum app, it is time to have a look at the Dynamic Storyboards configuration interface in the above screenshot.
This interface is divided in two parts: Storyboard ViewControllers, and ViewControllers State Properties. For now the first one presents the list of view controllers defined in the associated Xcode app's storyboards, and the second one is empty. Each view controller is referenced by its Storyboard Identifier and its class. Only view controllers with a defined storyboard identifier can be selected.
To start with, we want to dynamically work on the Albums List View Controller, but it has no storyboard identifier yet, and therefore it cannot be selected.
To fix this, while leaving the Associated Xcode Project sheet open in Bounces, switch to Xcode and set an identifier for this view controller in PhotoAlbum's Main storyboard.
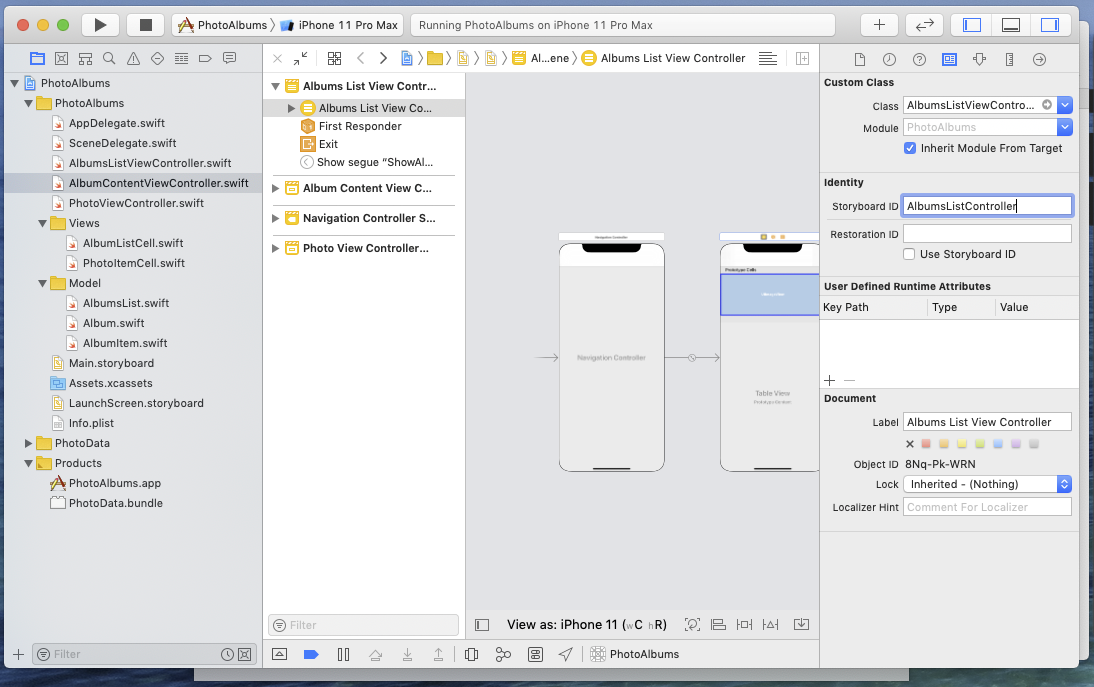
Switch back to Bounces. After a few seconds, the Albums List Controller can now be selected for dynamic update.
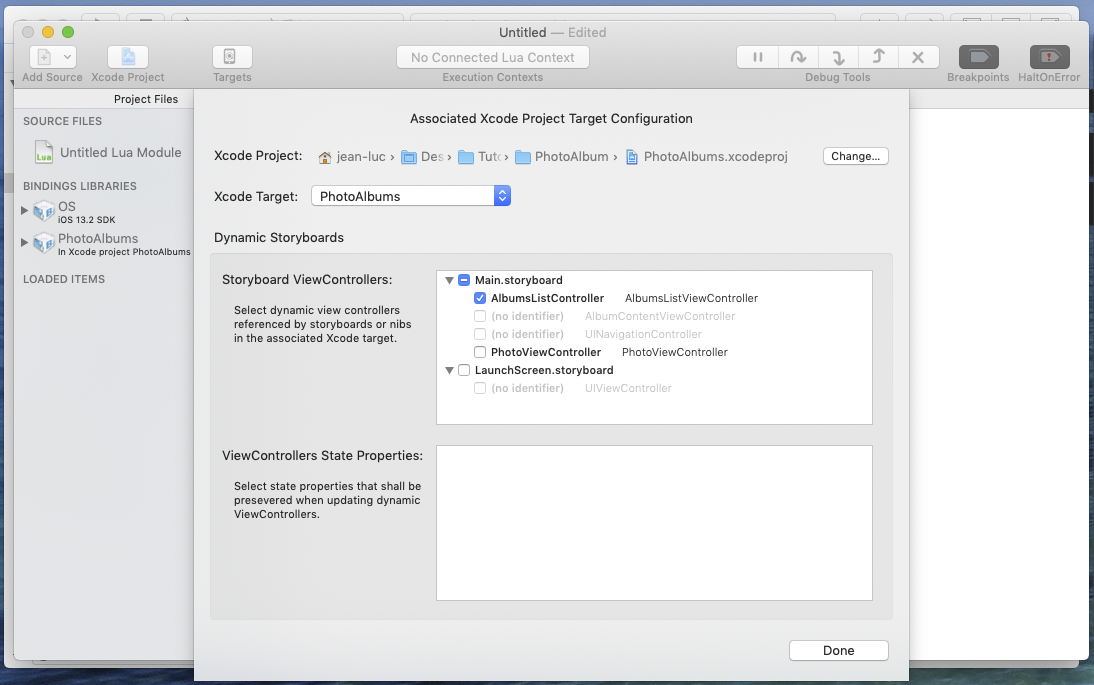
Click on the Done button. The configuration sheet is dismissed and the project gets updated.
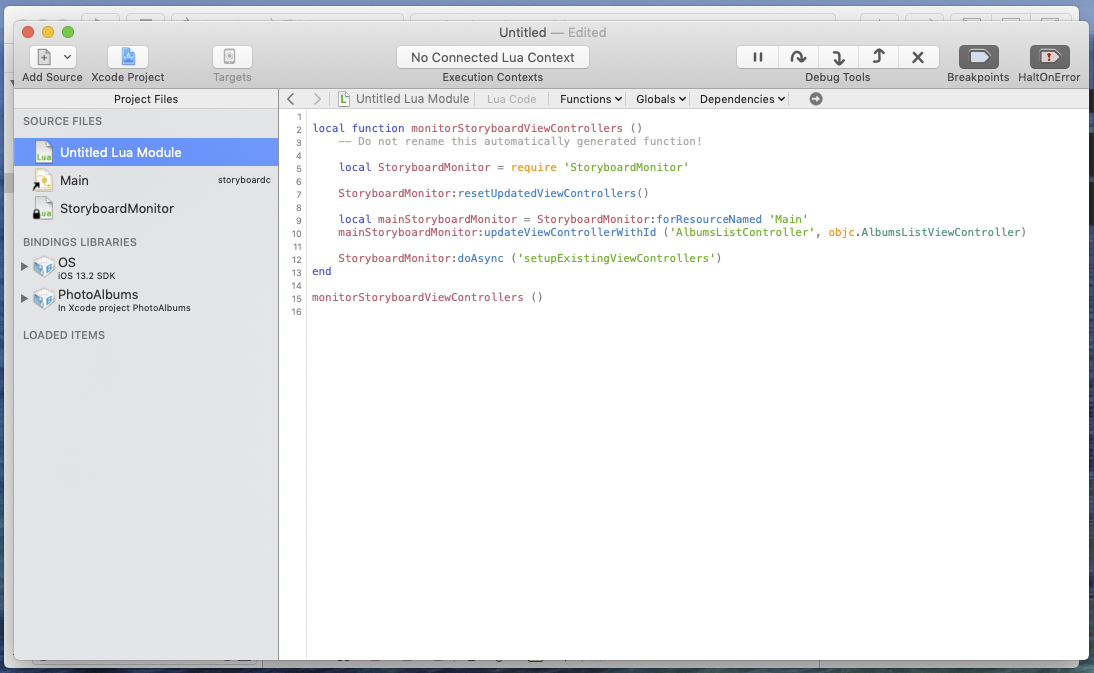
Adding a dynamic view controller caused the following changes in the project:
- Storyboard monitoring code has been inserted in the Untitled Lua Module.
- A storyboard resource referencing PhotoAlbum's Main storyboard has been added to the project.
- A StoryboardMonitor Lua module (implementing dynamic storyboard updates) has been added to the project.
Configure the PhotoAlbum Xcode project for dynamic updates
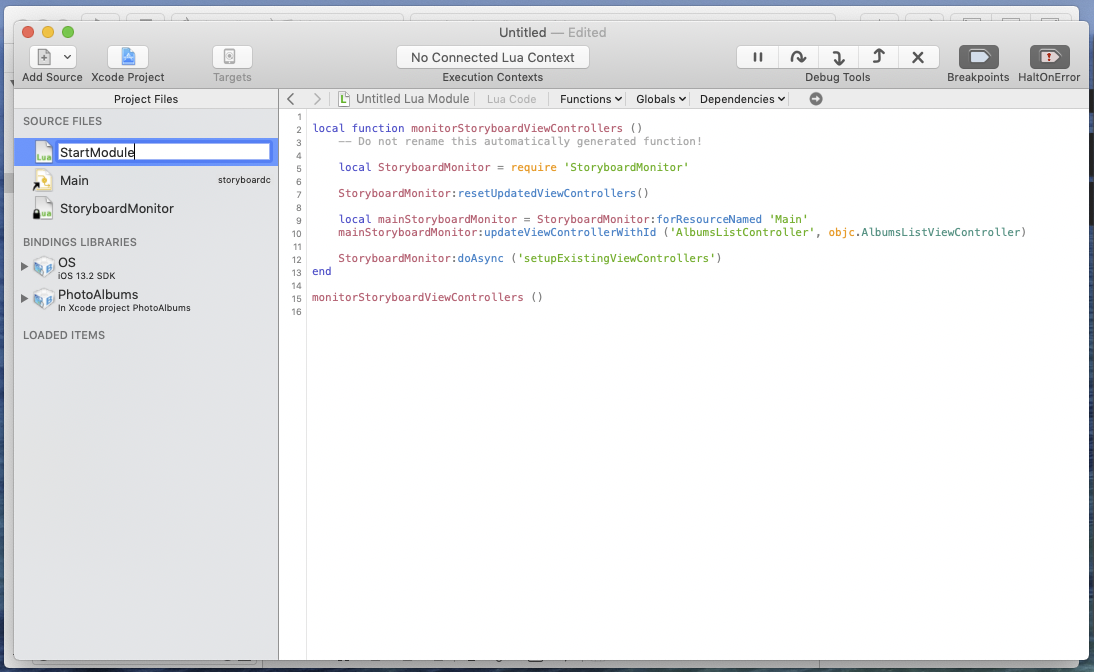
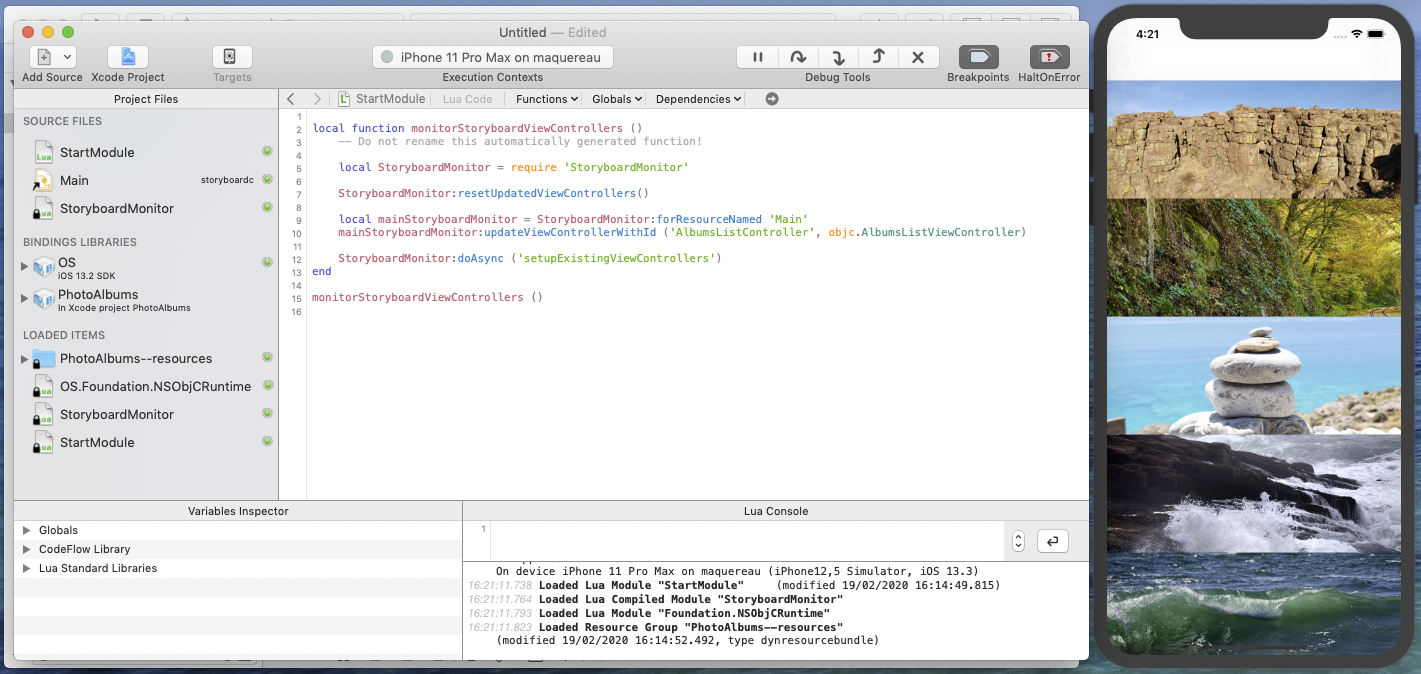
Now you are almost ready to run PhotoAlbum with dynamic updates. But first you need to give a name to this Untitled Lua Module: click on the module's name and replace it with StartModule.
Then switch to Xcode, and in the PhotoAlbum app delegate, import CIMLua and add the following code line in application(_:, didFinishLaunchingWithOptions:)
LuaContext.defaultMonitored.loadModule("StartModule", completion: nil)
What this code line does:
LuaContext.defaultMonitoredgets or creates a default Lua execution context and connects it to the Bounces project associated to the current application (the monitored suffix here standing for "monitored by Bounces");loadModule(-:, completion:)loads the Lua module named StartModule of the associated Bounces project in the caller Lua execution context. This module load operation takes place asynchronously, i.e. without blocking the app's main thread if the network connection to the Bounces app takes an unexpected amount of time.
Run the PhotoAlbum app
Build and run the PhotoAlbum app in Xcode.
For a simple matter of convenience, the screenshots in this post show the app running on the iPhone simulator, but we encourage you to run the PhotoAlbum app on a real device if you can.
If you switch back to your Bounces project, you can see that an execution context is now connected (named according to the device on which PhotoAlbum is running). Also in the Loaded Items section of the left column, you can see the list of Lua code modules and ressources that have been executed in the connected execution context so far.
Refining the Albums List Screen
Let's recap where we are: the PhotoAlbum app is now running on a target device and the app is configured for dynamically updating the Albums List View Controller in the Main storyboard.
So now you can start working on the corresponding storyboard scene and see the target application change automatically to show the changes you just made.
Well, almost automatically. To trigger a storyboard update in the target application, you still have an action to perform: to save the current state of the storyboard in Xcode (e.g. by pressing cmd-S). And that's it, Bounces handles the rest of the storyboard update process for you.
So, just remember you have to save the storyboard after editing it in Xcode when you want to trigger a storyboard update in the target application.
In the rest of this tutorial, to avoid repeating it it again and again, the action of saving the storyboard after editing it will generally be implicit.
To improve this Albums List screen, you will work on 3 aspects:
- Set a screen title in the navigation bar,
- Add small separators between albums,
- Show the title of every album.
Set a navigation title
The navigation bar in the Albums List screen is empty. Setting a title would help the user to get an idea of what is presented here. This is an easy change, so let's do it.
Select the Navigation Item in the Albums List View Controller, set its title to "My Albums", and save the storyboard. The title appears in the target application.

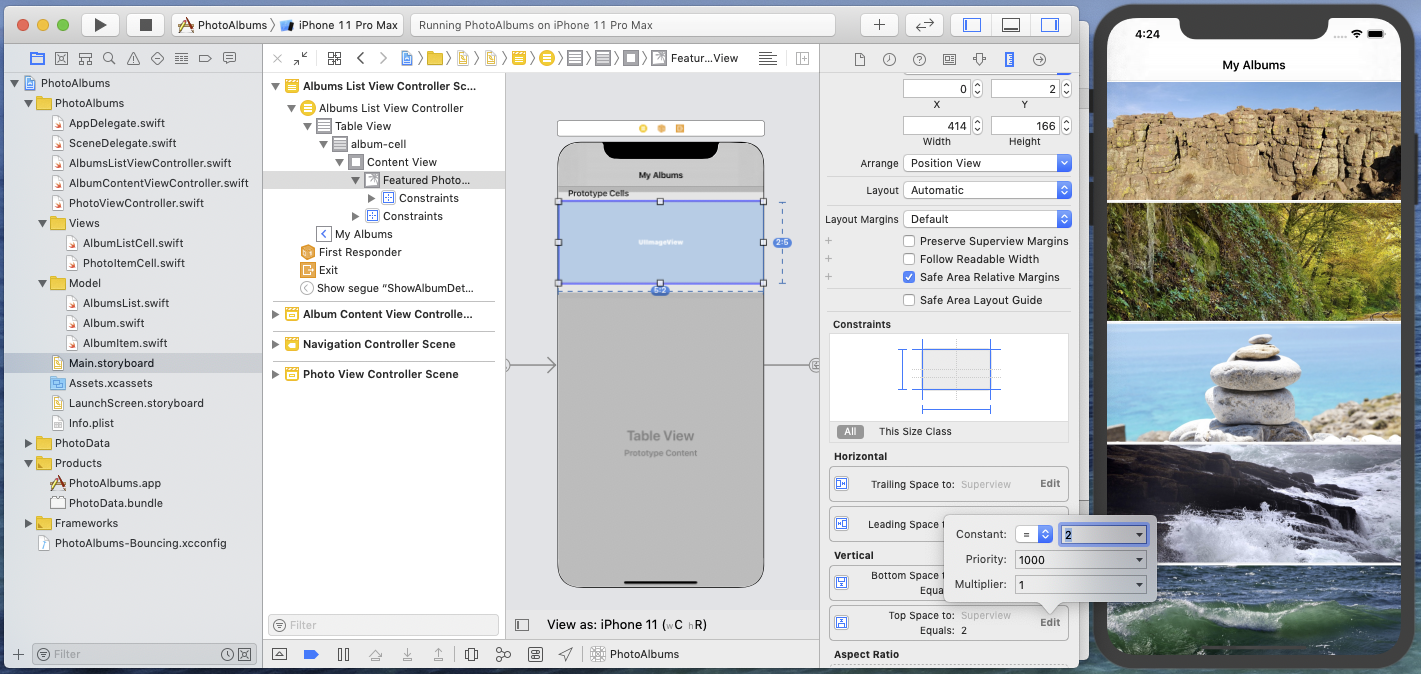
Add space between albums photos
To add spacers in the albums list layout, a simple way is to set small vertical margins between the Featured Photo view and its parent view in album-cell.
Select the Featured Photo view and, in the Size Inspector, set a 2-points constant in the top and bottom space layout constraints. Save the storyboard, et voilà!
Add a title to the album cell
The AlbumListCell class declares a titleLabel IBOutlet, but no corresponding UILabel has been defined in the storyboard. This has to be fixed.
Drag a UILabel in the album-cell, set its placeholder string to "Album Title", and add layout contraints to make it horizontally centered and at a fixed distance from the top of the cell's Content View:
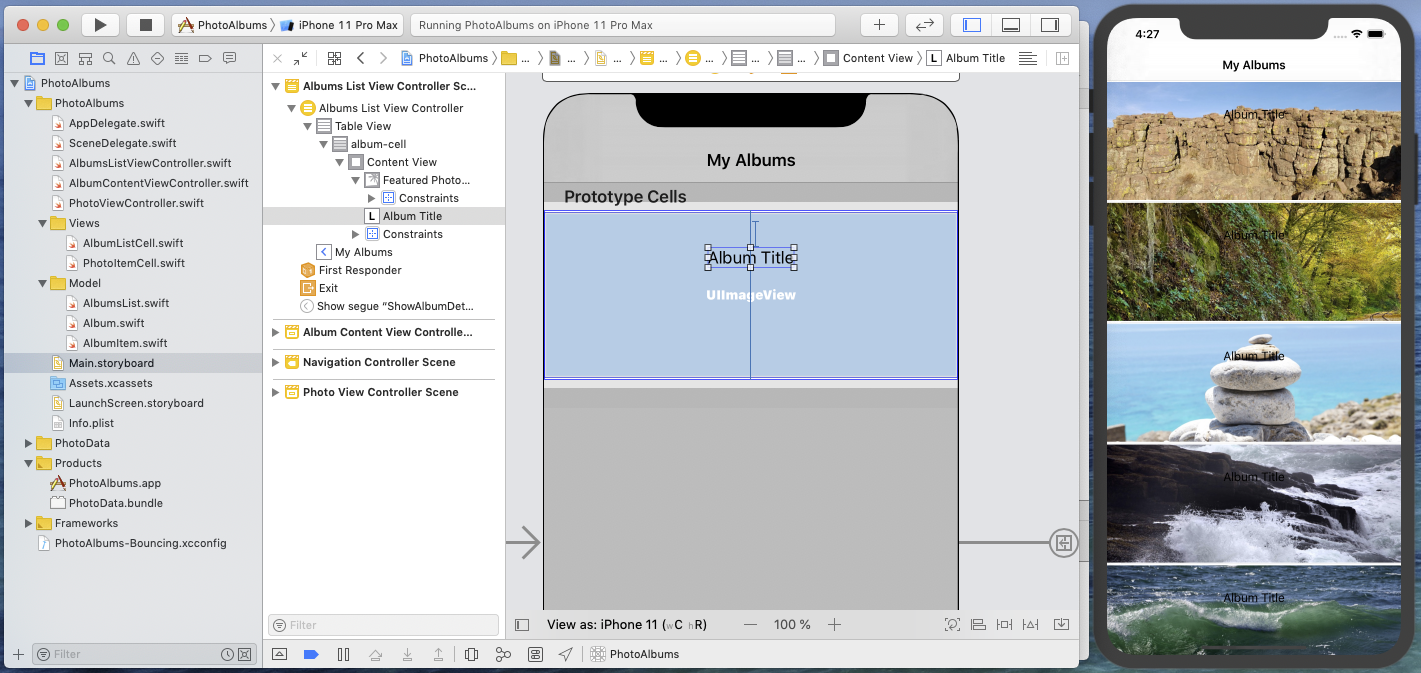
The album cell title is hardly readable with its default settings. Set the font to Large Title, the color to white, and check the Automatically Adjust Font checkbox, so as to support Dynamic Types.
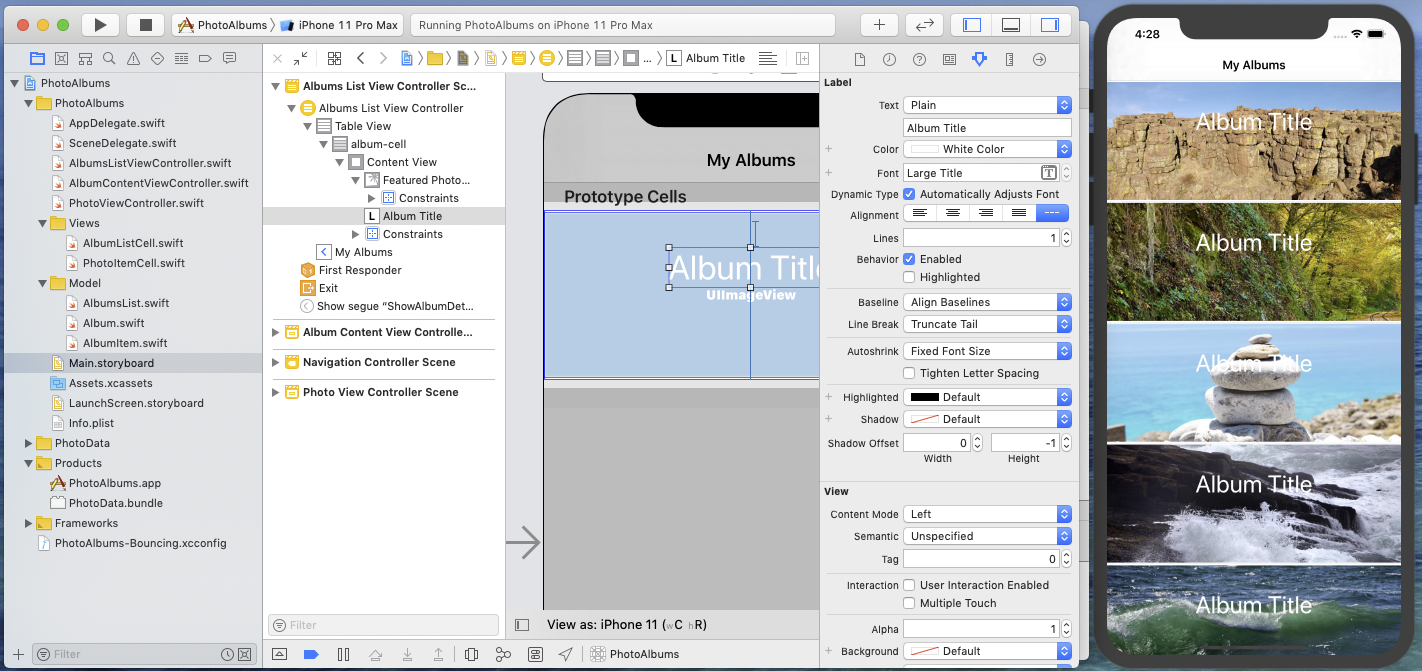
This looks better. We can now get rid of he placeholder string and display actual data in the album cell. To do this, connect the album-cell's outlet titleLabel to the Album Title label, and save.
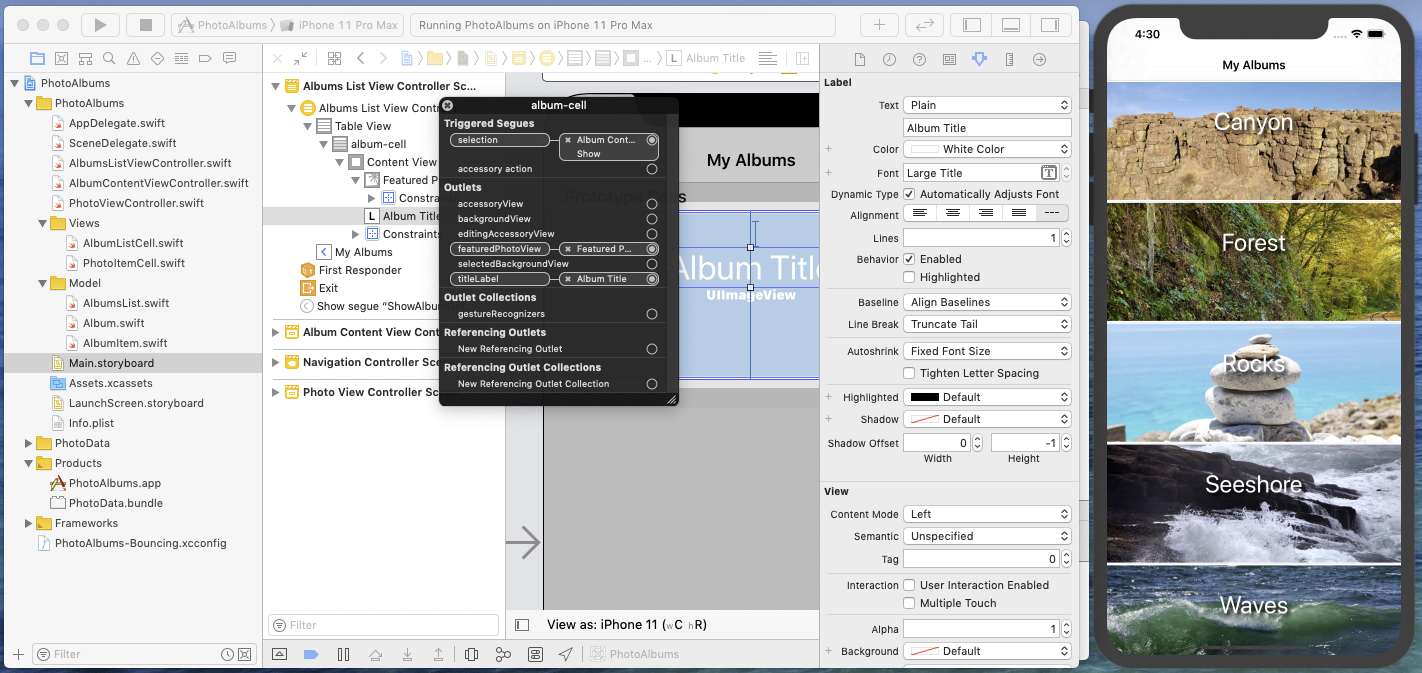
The target application displays the title for every album. And as a bonus for better readability, the Album Title label gets a shadow added by code in the AlbumListCell class.
Wrap up and next step
In this first part of the Storyboard Updates In Depth Tutorial, you have configured an existing Xcode project for dynamic storyboard updates. Then, by doing a series of small changes in the PhotoAlbum storyboard, you have significantly improved the Albums List screen while directly visualizing the effect of your edits on an actual data set in the running target application.
If you want to test the PhotoAlbums project in its current state at this point, you can download the PhotoAlbums project (step 1).
It's now time to move on and work on an other screen that could benefit from a better interface: the Photo View Controller. This is precisely the subject of this next tutorial: Storyboard Updates In Depth - Part 2 - Managing View Controller State.