Bounces Tutorial
Create a UICollectionView-based application with Bounces
This tutorial will guide you through the development with Bounces of a very simple UICollectionView-based application. This app development will be entirely done in live-coding mode, meaning that we will launch the application only once, and then we will add the application's code and features dynamically, while the app is running and without having to restart it.
Note This tutorial was originally written when Bounces was still named CodeFlow, therefore this old name may still be present in most included screen captures and videos.
You may want to read this tutorial for various reasons, and especially if:
- you are curious of what live-coding and Bounces can bring to the development of iOS applications;
- or you are looking for an introduction to UICollectionViews in iOS and how they can simply be used (the code presented here in Lua can easily be transposed to Swift or Objective-C);
- or if you are familiar with Lua and you are interested to see how Lua can be used for the development of native iOS apps...
In this tutorial, the application will be created programmatically in Lua with Bounces. As an alternative, you could use a mix of storyboard and code; if you want to know how Bounces makes storyboards dynamic, you can have a look at this post: Live Storyboards in Bounces 1.0.
To try this tutorial by yourself, you need a Mac with Xcode 9 or higher and Bounces installed. You can write the CollectionView tutorial application all by yourself or download the code on github.
This tutorial includes short videos that show the dynamic aspects of the app development development with Bounces. In these videos, you can see both what is going on on the Mac screen during the development and the AirPlay-mirrored screen of the target iOS device running the application (using the excellent Reflector application).
The creation of this CollectionView-based application will be done in 5 steps:
- Setting up the application project
Create an application project in Bounces, run the app on a target device and see a first example of dynamic code update. - A very simple CollectionView
Add the minimal code to the application for displaying a UICollectionView with a simple Flow Layout and see the live-coding in action. - Pinching the cells
Add a pinch gesture recognizer to the CollectionView, check the correct execution of this gesture recognizer with the Bounces debugger, and customize the CollectionView layout to zoom the pinched cell when the gesture is executed. - Spread the words
Fill the CollectionView cells with words from a text file, test the live resource update in Bounces when this file is changed, and set an individual size for each cell in the CollectionView, to match various words sizes. - Creating a standalone application
Finally, export the Bounces program in the associated Xcode application, and create a standalone iOS application.
So, time to start!
Step 1 - Setting up the application's project
Create a Bounces project
In Bounces, you create a new project with the New Project From Template… command in the File menu:
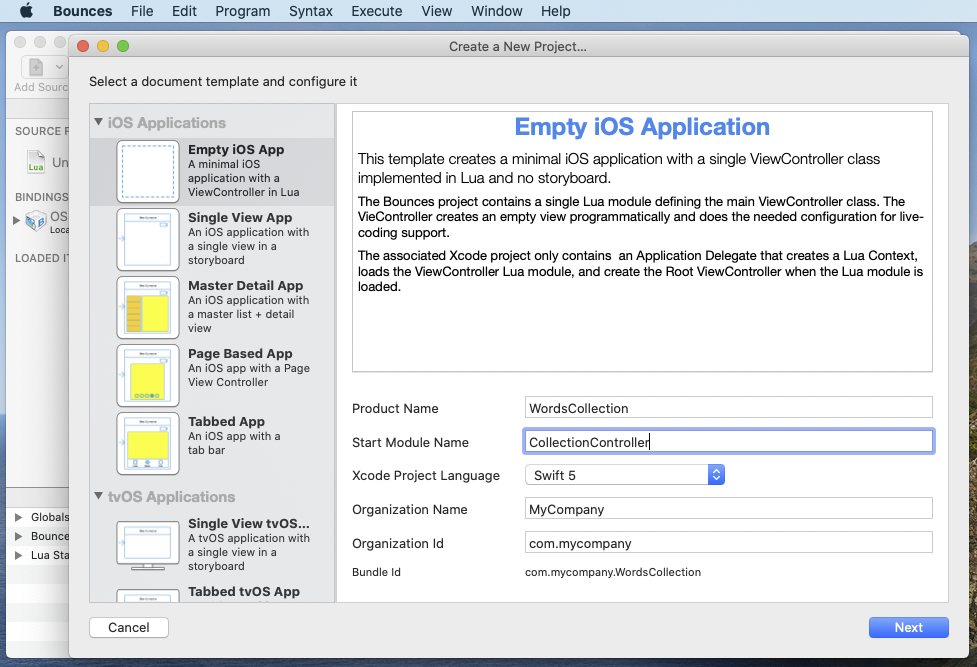
Select the Empty iOS App template. This template contains a single Lua module, that creates the class of the root View Controller. In our project, the root controller class will manage a collection view, so change the Start Module Name to CollectionController. In addition, you need to set a Product Name for the new application: here we choose to name it "WordsCollection".
Then select the programming language of the Xcode project associated to this Bounces program: depending to your personal preferences and Xcode version, you can select Swift or Objective C.
When you are done, click on the Next button, and choose a location for the new project. A folder containing both a Bounces project and an Xcode project is created at this location, and Bounces will manage the Xcode project's configuration for you, to make live-coding easy and transparent.
Bounces now shows a new project window named WordsCollection :

This window shows a simple classic arrangement: on the left, the project files list, and on the right a Lua code editor. The toolbar on top contains debug tools and the list of Connected Lua Contexts, i.e. monitored target applications.
Let's have a look at the project files list. The new empty iOS App comes with a single item in the Source Files section: the CollectionController Lua module. Source files in a Bounces project can be of various types: Lua source files, also named Lua modules, contain the code of the project; other files, called resources, can contain any type of data: text, images, media files…
The next section in the files list is called Bindings Libraries: a Bindings Library provides access from Lua to native APIs defined in a SDK – the iOS 11.2 SDK here – or in a Xcode project – the WordsCollection project in this example. The last section is called Loaded Items and it is currently empty; when running a target application, it will contain the list of every Lua module or resource file loaded in the target application.
Explore a Lua module
The Lua code in the CollectionController module initially contains a generic UIViewController subclass skeleton, provided by the Empty iOS App template:
local CollectionController = objc.UIViewController:createSubclass ("CollectionController")

function CollectionController:loadView ()
    -- Create the controller's view programmatically.
    self.view = objc.UIView:new()
end

function CollectionController:viewDidLoad ()
    -- subscribe to the generic "did load module" messages
    self:addMessageHandler ("system.did_load_module", "refreshView")

    self:configureView ()
end

function CollectionController:configureView ()
    -- Put here the code configuring the controller's view
    self.view.backgroundColor = objc.UIColor.whiteColor
end

function CollectionController:refreshView()
    -- This method will be executed when the module is reloaded.
    self:configureView() -- make sure that the controller's view configuration is up-to-date
    -- ... Do additional actions to refresh the display or the controller internal state, if needed
end

-- return the ViewController class
return CollectionController
Soon we will customize this code to implement a working UICollectionViewController, but first let review this code and get a first understanding of a typical Lua class declaration module:
- line 1: create a
UIViewControlllersubclass by calling methodcreateSubclasson native classobjc.UIViewControlller, the new class being named "CollectionController". The created class is stored in a Lua local variableCollectionController.
Note the use of theobjc.prefix to reference native classes from Lua (as they are exposed by the objc runtime in iOS). - line 3-6: define an instance method
loadViewof the CollectionController class (note the Lua method declaration syntaxfunction classVar:methodName(params) ... end). This method overrides theUIViewControllermethod with the same name.- line 4: a Lua comment, started by
--. - line 5: create a new
UIViewinstance and assigns it to theviewproperty of the current objectself(the current object is a View Controller, so this makes sense).
- line 4: a Lua comment, started by
- lines 8-13: define the
viewDidLoadmethod for this class (overriding UIViewControllerviewDidLoadmethod)- line 10: add a Message Handler on the current object, for the general module reloaded notification
"system.did_load_module". This message handler will call therefreshViewmethod on the current object each time a Lua module will be reloaded during the application's live development, giving the opportunity to refresh the Controller's view to make it match the updated code. - line 12: call the internal method
configureViewon the current objectself.
- line 10: add a Message Handler on the current object, for the general module reloaded notification
- lines 15-18: define an internal method
configureView, called —fromviewDidLoad— when the view is loaded and —fromrefreshView— when a Lua module in the project is updated; originally this method does nothing but setting the background color of the view to the white color. - lines 20-24: define method
refreshView, called by the message handler added on line 10. - line 27: by convention, a Lua module creating (or extending) a class always return a reference to this class as the module's result.
Good. Now you understand the structure of a typical Lua module in Bounces, and it is time to start playing with it, and to run the application.
Run the application
To build and run the application for the first time, we need to switch to the Xcode project associated to our Bounces project.
To do this, select Open Xcode Project from Bounces's Program menu (or press ⇧⌘O). This opens the associated project in Xcode, and you can just run the application on a target device or simulator, as shown in this video:
When the WordsCollection application is started on the target device (the iPhone simulator here), it appears automatically in Bounces (as you can see at 0:22 in the video), and the Start Lua Module CollectionController gets loaded into the app.
Then if you change some code in this module (at 0:29 in the video), the updated version of the module is loaded in the app, causing the refreshView method to be called, and the view background color to be set to green.
Great! You have dynamically edited the application code, and you have seen the app immediately updated to stay in sync with the code. This is what we call live coding.
And this is it for the first step of this tutorial: you have created a Bounces project, you have run it and got a first feeling of live-coding. And this setup phase was really fast and easy thanks, to Bounces project templates.
Now you can stop the target application, because the next step will involve significant changes to the CollectionController Lua module's code, including changing its superclass…
Step 2 - A very simple CollectionView
To present its content onscreen, a collection view cooperates with different objects. The most important of these objects are:
- the Data Source that provides the individual Cell View that are displayed by the Collection View;
- the Cell Views that usually require the implementation of one or several custom classes;
- the Layout that defines how individual Cell Views are arranged inside the Collection View, e.g. as grid or as a circle.
To keep things simple, we will define a single type of Cell View containing only a text label, and the Layout will be based on the classic grid-based UICollectionViewFlowLayout. And the Data Source protocol will be implemented by our CollectionController class.
Two new modules for this project
Each class of the collection view will be implemented in its own Lua module. So we will need to add extra Lua modules in our WordsCollection project.
In Bounces Program menu, select New Empty Lua File to add a new empty Lua module to the project (or use the equivalent Add Source item in toolbar), and name this module "LabelCell". It will implement a UICollectionViewCell subclass for this project.
Then add another Lua module named "PinchFlowLayout" to the project. It will contain the collection view layout implementation.
In the labelCell module, write or paste the following code:
-- Define local references to native classes
local UICollectionViewCell = objc.UICollectionViewCell
local UILabel = objc.UILabel
local UIColor = objc.UIColor

-- Get needed enums from the iOS SDK
local AutoResizing = objc.UIView.Autoresizing
local TextAlignment = require("UIKit.NSText").Alignment

-- Create the LabelCell class (subclass of UICollectionViewCell)
local LabelCell =  UICollectionViewCell:createSubclass ("LabelCell")

-- initializer
function LabelCell:initWithFrame (frame)
    self[UICollectionViewCell]:initWithFrame (frame) -- call super
    self:setAppearance()
end

-- Cell configuration
function LabelCell:setAppearance ()
    local contentView = self.contentView
    contentView.clipsToBounds = true
    contentView.backgroundColor = UIColor.grayColor

    local label = self.label
    if label == nil then
        -- create the label and add it to the contentView
        label = UILabel:newWithFrame(contentView.bounds)
        label.autoresizingMask = AutoResizing.flexibleHeight + AutoResizing.flexibleWidth
        label.textAlignment = TextAlignment.center
        contentView:addSubview(label)
        self.label = label
    end

    label.font = objc.UIFont:boldSystemFontOfSize (28.0)
    label.backgroundColor = UIColor.clearColor
    label.shadowColor = UIColor.darkGrayColor
    label.textColor = UIColor.whiteColor
end

-- return the LabelCell class
return LabelCell
By default, UICollectionViewCell defines an empty contentView. Therefore we has to subclass it to add some real content to the cell. This is precisely what the above code does: it creates and configures programmatically a UILabel, and adds it as a subview of the cell's contentView.
What is interesting here is the way to write such a typical piece of code using UIKit in Lua. As you can see, this is simple and natural, and even if you are an iOS developer who has never read Lua code before, it should look quite familiar to you. Let's review this code:
- lines 2-4: store references to several native classes in local variables. This makes the code more readable and increases execution speed (because getting these classes from the runtime is done only once when the Lua module is loaded).
- line 7: store the UIView AutoResizing mask enum in a local variable. Note how a class-related SDK enum is stored in its related native class. This variable is used to access the auto-resizing mask constants on line 29:
Autoresizing.flexibleHeightandAutoresizing.flexibleWidth. - line 8: non-class-related enums are accessed by loading a SDK bindings module with the
requirefunction. Here text alignment enum values are extracted from iOS SDK moduleUIKit.NSText. VariableTextAlignmentis used on line 30 for gettingTextAlignment.center. - line 11:
LabelCellclass creation. We have seen this pattern before when we created theCollectionControllerclass. - lines 14-17: LabellCell initializer method implementation
- line 14: Lua method definition.
function LabelCell:initWithFrame (frame)defines in the class referenced by the local variableLabelCella methodinitWithFramewith a single parameterframe.:is the Lua delimiter for defining or calling a method. - line 15:
self[UICollectionViewCell]:initWithFrame (frame)calls theinitWithFramemethod of the superclassUICollectionViewCell.
Read this as: "call theinitWithFramemethod onselfconsidered as aUICollectionViewCell", which is exactly what calling super means in statically compiled languages.
- line 14: Lua method definition.
- lines 20-39: LabelCell
setAppearancemethod implementation- line 21:
self.contentViewgets the ObjC propertycontentViewofself. Simple and straightforward. - line 22: likewise,
contentView.clipsToBounds = trueset the contentView's native propertyclipsToBoundsto the boolean valuetrue. - line 25:
UIColor.grayColorgets UIColor's native class propertygrayColor. - line 28:
objc.UILabel:newWithFrame(contentView.bounds)creates aUILabelinstance. It is equivalent to Swift codeUILabel(frame: contentView.bounds)or to Objective-C code[[UILabel alloc] initWithFrame:contentView.bounds].
- line 21:
- line 42: return the
LabelCellclass as the module's result.
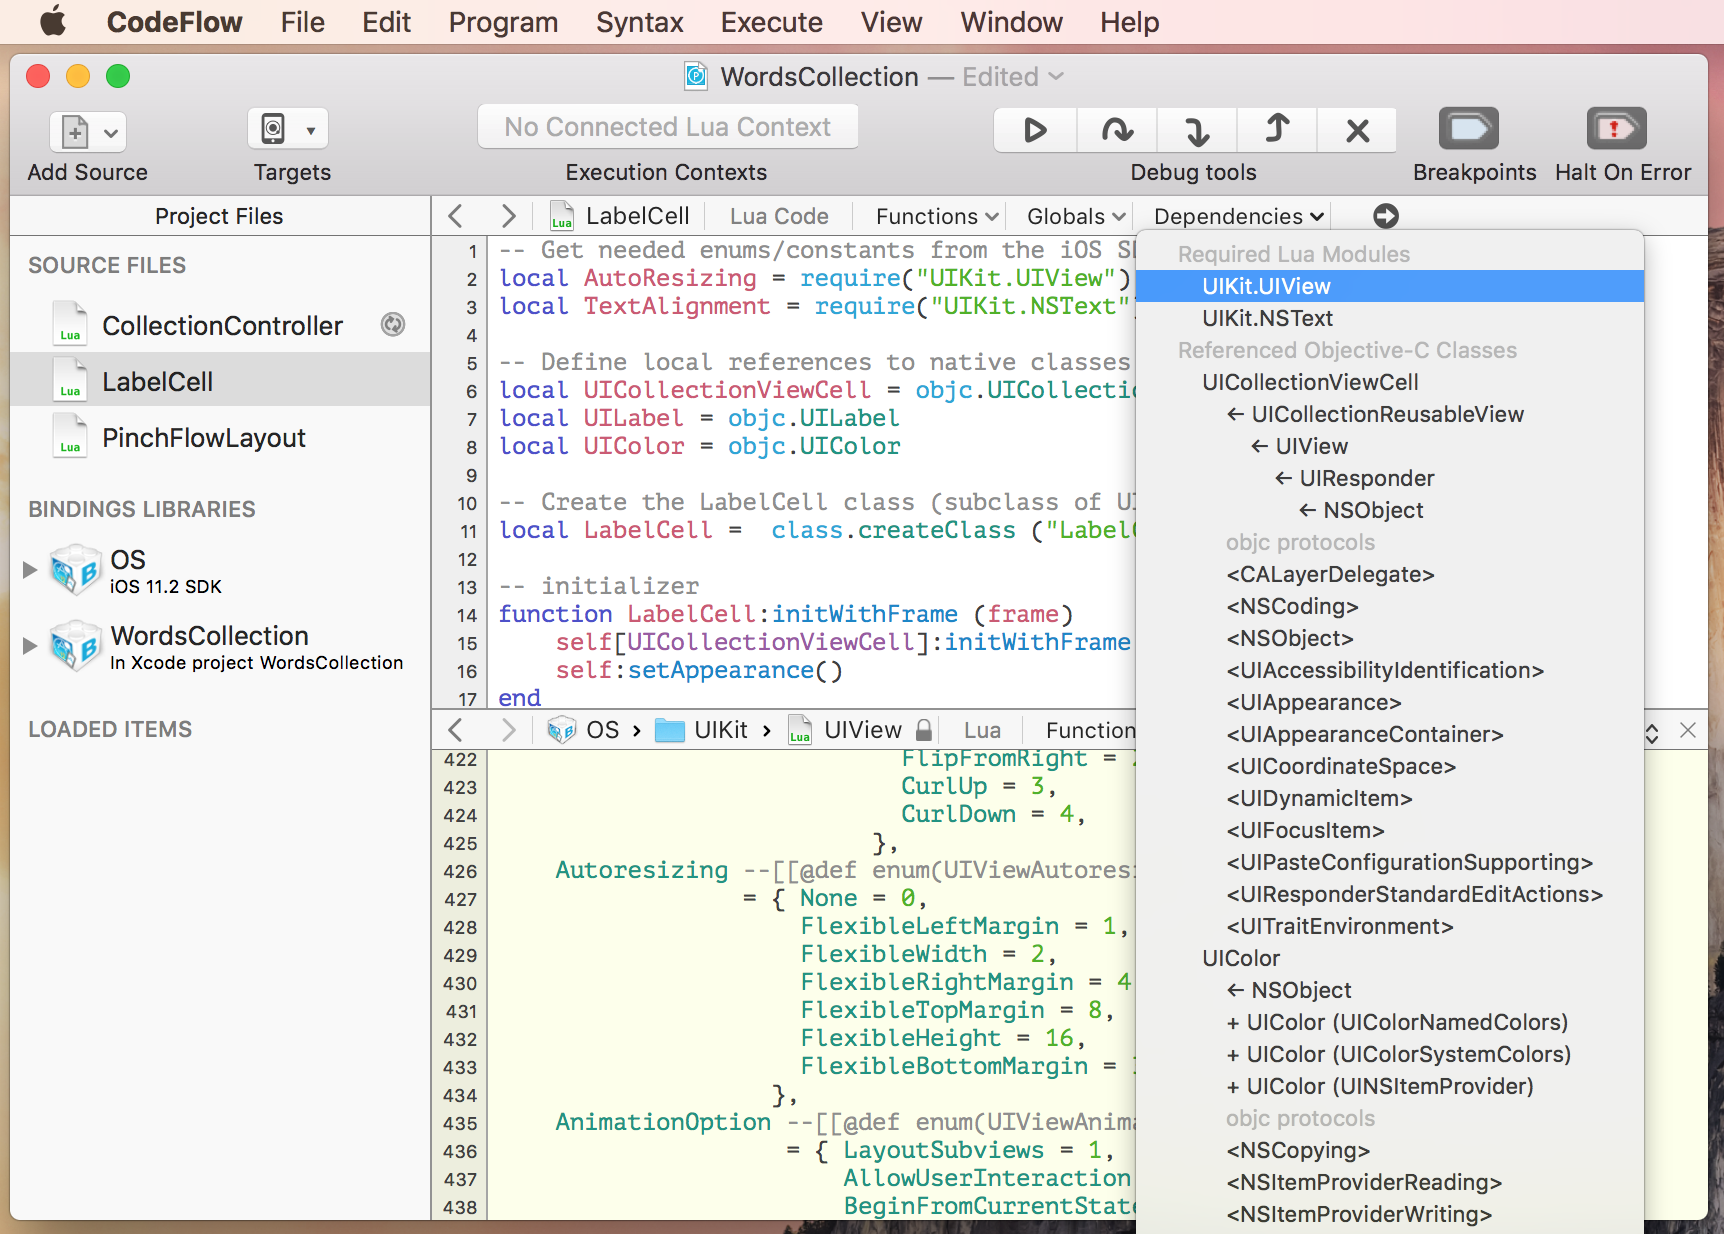
Tip: To find out the exact naming of SDK enums or constants, use the "Dependencies" menu in the code editor. For example, you can see the UIViewAutoresizing enum like this:
Now switch to the PinchFlowLayout module, and write or paste the following code:
-- Define local references to native classes
local UICollectionViewFlowLayout = objc.UICollectionViewFlowLayout

-- create the PinchFlowLayout class (subclass of UICollectionViewFlowLayout)
local PinchFlowLayout = UICollectionViewFlowLayout:createSubclass ("PichFlowLayout")

return PinchFlowLayout
This module is essentially empty at this stage: all it does is to define the PinchFlowLayout class for the collection view.
A dynamic Collection Controller
Now, back to the CollectionController module. We will modify it to convert the CollectionController class into a real Collection View Controller. For this, we have to:
- define
CollectionControlleras aUICollectionViewControllersubclass, - declare
LabelCellas the class of cells in the Collection View, - implement the Collection View data source required methods,
- add code to refresh the Collection View in the
refreshViewmethod.
The modified code stays rather simple. Let's have a look at it:
- Get the PinchFlowLayout and LabelCell classes by loading the corresponding Lua modules
local CollectionViewLayout = require "PinchFlowLayout"
local LabelCell = require "LabelCell"

local CollectionController = objc.UICollectionViewController:createSubclass("CollectionController")

function CollectionController:init ()
    return self:initWithCollectionViewLayout(CollectionViewLayout:new())
end

function CollectionController:viewDidLoad ()
    -- register the cell class
    self.collectionView:registerClass_forCellWithReuseIdentifier (LabelCell, "LABEL_CELL")

    -- subscribe to the generic "did load module" messages
    self:addMessageHandler ("system.did_load_module", "refreshView")

    self:configureView ()
end

function CollectionController:configureView ()
    -- Put here the code configuring the controller's view
    local collectionView = self.collectionView
    collectionView.collectionViewLayout.itemSize = { width = 100, height = 80 }
end

-- Collection view data source methods

local baseCellCount = 70

function CollectionController:collectionView_numberOfItemsInSection (collectionView, section)
    return baseCellCount
end

function CollectionController:collectionView_cellForItemAtIndexPath(collectionView, indexPath)
    -- get a cell from the collection view
    local cell = collectionView:dequeueReusableCellWithReuseIdentifier_forIndexPath ("LABEL_CELL", indexPath)
    local cellIndex = indexPath.item
    cell:setAppearance()
    cell.label.text = "Yo"
    return cell
end

function CollectionController:refreshView()
    -- This method will be executed when the module is reloaded.
    local collectionView = self.collectionView
    if collectionView ~= nil then
        -- make sure that the controller's view configuration is up-to-date
        self:configureView()
        -- Refresh the collection view: data and layout
        collectionView:reloadData()
        collectionView.collectionViewLayout:invalidateLayout()
    end
end

-- return the ViewController class
return CollectionController
A few highlights on this module, where we see the first signs of live-coding:
- lines 8-10: define the CollectionController default initializer. This method simply calls the UICollectionViewController's designated initializer
initWithCollectionViewLayoutand pass it thePinchFlowLayoutclass as the Collection View layout. - line 13: in the
viewDidLoadmethod, set the CollectionView cell reuse identifier"LABEL_CELL"and classLabelCell. - line 25: in the
configureViewmethod, set the cell size in the Collection View layout. - lines 28-42: implementation of the CollectionView Data Source.
- line 29: defines the number of cells in the CollectionView as a Lua local variable at the main level of the Lua module. This local variable is visible from any function or method defined in its scope, and for example, is returned by method
collectionView_numberOfItemsInSectionat line 31. Such captured variables are called up-values in Lua and are a nice feature of the language. - lines 35-42: method
collectionView_cellForItemAtIndexPathgets a cell from the CollectionView reuse queue, make sure that this cell is correctly configured by callingcell:setAppearance()and fills the cell label with a simple"Yo".
- line 29: defines the number of cells in the CollectionView as a Lua local variable at the main level of the Lua module. This local variable is visible from any function or method defined in its scope, and for example, is returned by method
- lines 44-54: the
refreshmethod use a really basic strategy to refresh the CollectionView when something in the code has changed: re-configure the CollectionView, reload the data, and invalidate the layout. This may seem a bit overkill, but this is a simple and effective strategy, as the frequency of the code changes will be limited by the developer coding speed.
A first taste of live-coding
Our basic CollectionView implementation is now ready-to-run. We run it on an iOS device (an iPod touch) and here is what we can see:
Great! Our CollectionView implementation is working as expected, which is not bad for a start, and, more important, we have done our first live-coding session and we have seen the CollectionView being immediately updated when we changed the code. Let's dive a bit more in details into this live-coding part.
To activate live-coding on the CollectionController Lua module, we have enabled the auto-reload mode, with the Reload Source File On Update command in the Execute menu. When auto-reload mode is enabled, any significant change in the module's source code is instantly propagated to the target Lua context on the device, and the Lua module gets reloaded, making the updated code available for execution. Alternatively we could have preferred manual reload mode and execute a Load Source File command whenever we want the currently edited module to be reloaded.
Once in auto-reload mode, we have first interactively modified the size of the CollectionView cell in the configureCollectionView method, and then we have set an individual text to each cell by modifying the code in collectionView_cellForItemAtIndexPath to add the cell index to the label. (This was done in the instruction cell.label.text = "Yo" .. tostring(cellIndex + 1) that uses Lua .. string concatenation operator and the tostring function from the Lua standrad library.)
At this stage, the cell gray background looks a bit dull, and we can check how cells with more various and colorful backgrounds would look.
The best place for setting the background color for a cell is probably the LabelCell:setAppearance method in the LabelCell module. As we want to set a different background color for each cell, we add two parameters to the method like this:
-- ...
function LabelCell:setAppearance (cellIndex, cellCount)
    -- set default values to params are not set
    cellIndex, cellCount = cellIndex or 0, cellCount or 1

    local contentView = self.contentView
    contentView.clipsToBounds = true
    contentView.backgroundColor = UIColor.grayColor

    -- Configure cell.label
    -- ...
end
Lua is really flexible regarding the number of parameters of a called function: missing parameters are set to nil and parameters in excess are just ignored. The first method statement cellIndex, cellCount = cellIndex or 0, cellCount or 1 just sets a default value for the cellIndex and cellCount parameters in case these aren't set by the caller.
In CollectionController:collectionView_cellForItemAtIndexPath, add cell index and count parameters to cell:setAppearance():
cell:setAppearance(cellIndex, baseCellCount)
Once this is done, paste the following code in LabelCell:setAppearance method to set an individual background color to the cell:
    local cellHue = (cellIndex / cellCount + 0.4) % 1.0
    contentView.backgroundColor = UIColor:colorWithHue_saturation_brightness_alpha (cellHue, 0.2, 0.8, 1)
    contentView.layer.borderWidth = 8
    contentView.layer.borderColor = UIColor:colorWithHue_saturation_brightness_alpha (cellHue, 0.9, 0.8, 1).CGColor
This sets a background color and a border with the same hue and a different saturation, as we can see here:
Once again, the application gets updated almost immediately and this is great for fine-tuning the code interactively, like here when we have changed the hue offset from 0.4 to 0.6.
Step 3 - Pinching the cells
In this step we will customize the layout of our CollectionView so that we can zoom and move a given cell when doing a two-fingers pinch gesture on it.
For this we need to add a pinch gesture recognizer to the CollectionView, and define a few properties in the CollectionViewLayout for storing the current cell index, zooming factor and position when a pinch gesture is done. The layout will use these properties to update the position and size of the pinched cell, so that the CollectionView can display it appropriately.
Adding properties to the layout
Because we want the layout to be updated as soon as the pinch gesture changes, we define a number of properties in the PinchFlowLayout class.
Lua object properties in Bounces are similar to Objective-C properties or Swift computed properties: an object property is used as a simple field, but it getting or setting it goes through hidden getter / setter methods. Every property setter in the PinchFlowLayout class here follows the same pattern: first it sets an internal object field to the set value, and then it invalidates the layout to force it to be recalculated and displayed.
This leads to the following code, added in the PinchFlowLayout module.
-- Declare a set of properties related to pinch gesture state

PinchFlowLayout.pinchedCellPath = property () -- declare pinchedCellPath as a property of class PinchFlowLayout

function PinchFlowLayout:setPinchedCellPath (path) -- setter for the pinchedCellPath property
    self._pinchedCellPath = path
    self:invalidateLayout()
end

PinchFlowLayout.pinchedCellScale = property { set = function (self, scale)
                                                        self._pinchedCellScale = scale
                                                        self:invalidateLayout()
                                                    end }
PinchFlowLayout.pinchedCellCenter = property { set = function (self, origin)
                                                         self._pinchedCellCenter = origin
                                                         self:invalidateLayout()
                                                     end }
PinchFlowLayout.rotationAngle = property { set = function (self, angle)
                                                     self._rotationAngle = angle
                                                     self:invalidateLayout()
                                                 end }
Unfortunately the above setters implementation can suffer from performance problems on old devices or for large collections, because invalidating the whole layout whenever the touch positions change can potentially involve lots of layout attributes computations and calls to the CollectionView delegate methods. This is not necessary in our case, because during a pinch gesture, only one cell -the pinched cell- shall see its layout change.
The good news is that there is in iOS a dedicated class for solving this issue, named UICollectionViewLayoutInvalidationContext, and that this class can be easily used without subclassing, thanks to the method invalidateItemsAtIndexPaths that takes as parameter an array of invalidated cellIndexPaths. We can then rewrite our setters to invalidate only the layout of the currently-pinched cell, like this:
-- Declare a set of properties related to pinch gesture state

PinchFlowLayout.pinchedCellPath = property ()

function PinchFlowLayout:setPinchedCellPath (path)

    self._pinchedCellPath = path

    if path ~= nil then
        local invalidateContext = objc.UICollectionViewFlowLayoutInvalidationContext:new()
        invalidateContext.invalidateFlowLayoutDelegateMetrics = false
        invalidateContext:invalidateItemsAtIndexPaths {path}
        self.pinchInvalidationContext = invalidateContext
        self:invalidateLayoutWithContext (self.pinchInvalidationContext)
    else
        self:invalidateLayout()
    end
end

function PinchFlowLayout:invalidateLayoutOfPinchedCell()
    if self.pinchInvalidationContext ~= nil then
        self:invalidateLayoutWithContext (self.pinchInvalidationContext)
    end
end

PinchFlowLayout.pinchedCellScale = property { set = function (self, scale)
                                                        self._pinchedCellScale = scale
                                                        self:invalidateLayoutOfPinchedCell()
                                                    end }
PinchFlowLayout.pinchedCellCenter = property { set = function (self, origin)
                                                         self._pinchedCellCenter = origin
                                                         self:invalidateLayoutOfPinchedCell()
                                                     end }
PinchFlowLayout.rotationAngle = property { set = function (self, angle)
                                                     self._rotationAngle = angle
                                                     self:invalidateLayoutOfPinchedCell()
                                                 end }
Note in line 5 the definition of a property setter as a regular method setPinchedCellPath. This has been preferred to an inline function declaration for clarity and readability reasons, as the pinchedCellPath setter is relatively complex. Other properties on lines 26, 30, 34 have their setters defined inline in the call to property(). Note also how a Lua table can be passed as the array parameter of invalidateItemsAtIndexPaths (in line 12, {path} is a Lua table literal).
Setting the gesture recognizer
Adding a gesture recognizer to the CollectionView is easy: we need to define a corresponding action method in the CollectionController class, to create a UIPinchGestureRecognizer targeting this action method, and to add the gesture recognizer to the CollectionView.
First we add the action method code to the CollectionController module. This code sets the layout properties that we have defined previously.
local UIGestureRecognizerState = objc.UIGestureRecognizer.State

function CollectionController:handlePinchGesture (gestureRecognizer)
    local layout = self.collectionView.collectionViewLayout

    if gestureRecognizer.state == UIGestureRecognizerState.began then
        if layout.pinchedCellPath == nil then
            local initialPinchPoint = gestureRecognizer:locationInView (self.collectionView)
            layout.pinchedCellPath = self.collectionView:indexPathForItemAtPoint (initialPinchPoint)
        end
    elseif gestureRecognizer.state == UIGestureRecognizerState.changed then
        layout.pinchedCellScale  = gestureRecognizer.scale
        if gestureRecognizer.numberOfTouches > 1 then
            layout.pinchedCellCenter = gestureRecognizer:locationInView (self.collectionView)
        end
    else
        -- We simply pass Lua functions for native blocks/closures parameters
        self.collectionView:performBatchUpdates_completion (function ()
                                                                layout.pinchedCellScale = 1
                                                                layout.pinchedCellCenter = nil
                                                            end,
                                                            function (finished)
                                                                layout.pinchedCellPath = nil
                                                             end)
    end
end

-- Declare action method 'handlePinchGesture' to make it callable from the native code
CollectionController:declareActionMethod ("handlePinchGesture")
Then we just have to create the UIPinchGestureRecognizer by adding the following code in CollectionController:configureView:
    if self.pinchRecognizer == nil then
        -- Create a pinch gesture recognizer
        local pinchRecognizer = objc.UIPinchGestureRecognizer:newWithTarget_action (self, "handlePinchGesture")
        collectionView:addGestureRecognizer (pinchRecognizer)
        self.pinchRecognizer = pinchRecognizer
    end
To check that the gesture recognizer actually calls the action method, we can use the integrated Bounces debugger and set a breakpoint in the action method, as shown in this next video...
As soon as we start a pinch gesture after having pasted the UIPinchGestureRecognizer creation code, Bounces stops on the breakpoint. We can then continue the execution step by step and inspect the variables and the callstack in Bounces Variables Inspector. Note that with Bounces, you can inspect variables of various types: Lua types, classes and object instances, C structs…
Updating the CollectionViewLayout
Everything is in place now for pinching a cell, except the PinchLayout module. To define a custom layout we need to override at least two methods of UICollectionViewLayout: layoutAttributesForElementsInRect and layoutAttributesForItemAtIndexPath
In our case, we simply need to change the default Flow layout attributes for the currently pinched cell if any. Therefore both overridden methods are similar: they first call the superclass UICollectionViewFlowLayout to calculate the default attributes; then if self.pinchedCellPath is non-nil (i.e. a pinch gesture is in progress) the pinchedCellScale and pinchedCellCenter properties are used to modify layout attributes corresponding to the pinched cell, if any.
function PinchFlowLayout:layoutAttributesForElementsInRect (rect)
    -- Ask the superclass to calculate the attributes
    local allAttributesInRect = self[UICollectionViewFlowLayout]:layoutAttributesForElementsInRect(rect)

    -- If a pinch gesture is active, handle it
    if self.pinchedCellPath ~= nil then
        for cellAttributes in allAttributesInRect do
            if cellAttributes.indexPath:isEqual (self.pinchedCellPath) then
                self:applyPinchToLayoutAttributes (cellAttributes);
            end
        end
    end

    return allAttributesInRect;
end

function PinchFlowLayout:layoutAttributesForItemAtIndexPath (indexPath)
    -- Ask the superclass to calculate the attributes
    local cellAttributes = self[UICollectionViewFlowLayout]:layoutAttributesForItemAtIndexPath(indexPath)

    -- If a pinch gesture is active, handle it
    if self.pinchedCellPath ~= nil and cellAttributes.indexPath:isEqual (self.pinchedCellPath) then
        self:applyPinchToLayoutAttributes (cellAttributes);
    end

   return cellAttributes;
end

function PinchFlowLayout:applyPinchToLayoutAttributes (layoutAttributes)
    if self.pinchedCellCenter then
        layoutAttributes.center = self.pinchedCellCenter
    end

    layoutAttributes.zIndex = 1

    if self._pinchedCellScale then
        layoutAttributes.size = { width = layoutAttributes.size.width * self._pinchedCellScale,
                                  height = layoutAttributes.size.height * self._pinchedCellScale}
    end
end
You can see in the video above how the pinched cell display appears right after pasting the code in PinchFlowLayout:applyPinchToLayoutAttributes, while a pinch gesture is in progress. This is real live-coding, and you can go much further and improve this layout iteratively while getting a consistent and immediate feedback on your target device!
Step 4 - Spread the words
Until now, our CollectionView project only contains code modules. But code isn't everything in an application: other elements like images, text, data or media files are equally important. That's why Bounces handles such resource elements at parity with code modules, providing Dynamic Resource Update for a true live-app-creation experience. In this fourth step we will set a textual content to the CollectionView cells, in the form of one word per cell.
Adding a resource file to the project
To integrate a resource in a Bounces project, you use the getResource method or function. getResource creates an association between a resource identified by its name and type, and an object property: when getResource is called or when the resource is updated afterward, the object property is set with the current value of the resource.
Often, the object property associated with a resource is implemented as a property, and this will be the case here: we will use a text resource and the associated property setter will decompose this text into individual words, store these words in an array (or more precisely a sequential Lua table), and finally ask the CollectionView to reload its data.
Let's see how this property is implemented:
local enumeration = objc.NSString.Enumeration

CollectionController.collectionText = property()

function CollectionController:setCollectionText(text)
    local fullRange = { location = 0, length = text.length }
    local words = {}
    local wordsCount = 0
    text:enumerateSubstringsInRange_options_usingBlock (fullRange, enumeration.byWords,
                                                        function(word)
                                                            wordsCount = wordsCount + 1
                                                            words[wordsCount] = word
                                                        end)
    self.textWords = words
    self.collectionView:reloadData()
end
A few comments about this code:
- line 1: put NSString enumeration options in a local variable for fast access
- line 3: declare a
collectionTextproperty in classCollectionController. - lines 5-16: implement a setter for this property.
- line 5: the
textparameter is supposed to be a string value, because the data associated with a text resource is a text string. - line 6: the
fullRangeLua table can be used where aNSRangeparameter is expected, because it has alocationkey and alengthkey, i.e. keys with the same names as the fields inNSRange. This is not specific toNSRange: a Lua table with keys matching the field names of a C-struct type supported by Bounces can be used in place of a parameter of this C-struct type, which is a convenient way of using lots of C APIs in Bounces. - lines 9-13: calls
NSStringmethodenumerateSubstringsInRange_options_usingBlockto enumerate the words in the text. As theblockparameter of this method, we use a simple anonymous Lua function with the same parameters as the expected block, and here the function's interface is further simplified and takes a single parameterword, because we are only interested by the first parameter of the block. The anonymous function adds every word in the text to a Lua tablewords. - line 14: sets a field named
textWordsof the current object with thewordstable. An object field can be set an any time and doesn't to be declared first. - line 15: finally the setter asks the CollectionView to reload its data, to take into account the new content of
self.textWords.
We then use the field textWords filled in setCollectionText to set the label in each cell with a word of the resource text. Therefore we update the cell.label.text = statement in method collectionView_cellForItemAtIndexPath like this:
function CollectionController:collectionView_cellForItemAtIndexPath (collectionView, indexPath)
    -- ...
    cell.label.text = self.textWords and self.textWords[cellIndex + 1] or ("Yo" .. tostring(cellIndex + 1))
    return cell
end
This sets the label text to the string in self.textWords at index cellIndex + 1 (by convention in Lua, the first index is 1), or if self.textWords is not set, it keeps the same Yo display as previously (making the change invisible until the resource is set).
And now, we can add the text resource to the Bounces project and add the corresponding call to getResource at the appropriate location in the project code (video):
A text file named h2g2 is added to the project by dragging it from the finder (you can use any text file for this). Alternatively it could have been added with the Add FileItem… command in the Program menu. The link badge on the text file icon in the Bounces window indicates that this item is a reference to an external file and that it will be updated whenever the external file is changed.
The call to the getResource method is then added at the end of method CollectionController:configureView:
if self.textWords == nil then
    self:getResource ("h2g2", "txt", "collectionText")
end
It loads the resource named "h2g2" of type "txt" and associates it with the object field collectionText (using the setter implemented previously). Here we chose to call getResource only once, when self.textWords is not set yet.
As soon as this call to getResource is added, we can see the words of our h2g2 text file appearing in the CollectionView on the target device.
Live resource update in action
What happens if we add more text to the h2g2 file?
If we double-click on the h2g2 resource in Bounces, it opens in the default editor for its content type, here the TextEdit application. In TextEdit we add more text to the file, and we save it.
We can see that the file change event is detected by Bounces, as the display of the h2g2 resource is updated to reflect the new content of the file. Simultaneously, the resource is updated on the target device and when we scroll in the CollectionView, we can see that it contains the words just added to the text.
This is Live Resource Update in Bounces: it just works. Live Resource Update is available with resources of any type: text, images, plist files, nib files… and is really key for live-app-creation!
Adjusting cell sizes to the content
We want to do a last improvement to the CollectionView display in this step. Currently all cells have the same size and some words are truncated while other seem lost in a too large area. To fix this, we will define an individual size for each cell that will fit the word it contains.
UICollectionViewFlowLayout defines a delegate method for setting a specific size for each cell: collectionView_layout_sizeForItemAtIndexPath. We implement this method in the CollectionController module with the following code:
function CollectionController:collectionView_layout_sizeForItemAtIndexPath(collectionView, layout, indexPath)
    local cellIndex = indexPath.item + 1
    local cellFont = ViewCellClass:labelFontForSize(layout.itemSize)
    local cellSize
    if self.textWords and (cellIndex <= #self.textWords) then
        local cellLabelSize = self.textWords[cellIndex]:sizeWithAttributes { [NsStringAttributes.NSFontAttributeName] = cellFont } -- iOS 8
        -- local cellLabelSize = self.textWords[cellIndex +1]:sizeWithFont (cellFont) -- iOS 6-7
        cellSize = { width = cellLabelSize.width + 30, height = layout.itemSize.height }
    else
        cellSize = layout.itemSize
    end

    return cellSize
end

CollectionController:declareProtocol "UICollectionViewDelegateFlowLayout"
The size calculation is rather simple. It keeps the cell height defined in the layout and calculate the cell width as the size of the current word displayed using the LabelCell-defined font, adding a 30 points margin to avoid overlap with cell border.
CollectionController:declareProtocol "UICollectionViewDelegateFlowLayout" makes the CollectionController class conform to the UICollectionViewDelegateFlowLayout protocol. Following this call to declareProtocol, any method defined in this protocol and implemented by CollectionController becomes visible from the native code, for example collectionView_layout_sizeForItemAtIndexPath.
We can see how the CollectionView is changed when we write or paste this code into CollectionController:
Et voilà! Each CollectionView cell now has its own size, matching the word it contains.
Step 5 - Creating a standalone application
We are now reaching the last step of this tutorial. Our WordsCollection Bounces project meets our expectations and runs quite well on the target device. We can now think of converting this Bounces project into a standalone application, that won't require the presence of Bounces to run.
This is done with the Export Program… command in the Program menu. The Export Program… command creates a LuaSourcePackage (a .luapkg directory) that contains all Lua code files and resources in the current Bounces project. Embedding a Bounces project in an application is simply done by copying the exported LuaSourcePackage into the application bundle and by setting the LuaSourcePackage identifier with the same string as the mainSourcePackageId parameter in the corresponding CIMLuaContext initializer.
All this export process in handled automatically by Bounces, as shown in this last video…
The Export Program… command displays a file save dialog to define the LuaSourcePackage location and to specify the corresponding Source Package identifier. When the Export button is pressed, Bounces creates the LuaSourcePackage and adds it automatically to the associated Xcode target.
Exporting the program is sufficient to run the CollectionViewTuto Xcode application in standalone mode: the Lua Context in the App will use the Lua modules and resources from the embedded LuaSourcePackage, unless a Bounces project selects this Lua Context as a target and connects to it. In which case, the Lua code modules and resources will have a higher priority than the embedded ones, and live-coding the application will still be possible.
But when the app development is complete, we want to prevent this possibility of being controlled as a Target Lua Context by Bounces. To do this, we just have to remove the Lua Context Monitor from the application code, for example by commenting out in the AppDelegate. This removes the communication links that Bounces uses to control the Lua Context in the application, making this Lua Context non-accessible from the network and therefore secure. Note that removing the Lua Context Monitor from the application is also strongly required before submitting your application to the AppStore!
And this is it! The Xcode project now contains a standalone regular application embedding the Lua code and resources defined in the Bounces project.
If we run this application from Xcode, we can check that it implements exactly the same features and behavior that we had previously tested from Bounces.
As a conclusion
In this tutorial, we have built a complete UICollectionView-based application in live-coding mode with Bounces, from the creation of the projects in Xcode and Bounces to the packaging of a standalone application integrating the Lua code and resources defined in the Bounces project.
If you have read this tutorial entirely, you have experienced the simplicity of Lua, you have seen how Lua modules can be used in a Bounces project, you know how to call native methods from Lua and how to expose Lua methods to the native code, and you know the basics of live code and resource updates.
In short, congratulations! You should now have a sufficient understanding of live app development with Bounces to start live-coding your own application.
You can download the code of the tutorial application on github.
If you want to learn more about the topics covered in this tutorial, here are some resources:
- Learning Lua:
- The Get Started with Lua tutorial series for Bounces is a good place to start. The first article is an introduction to the Lua language itself, and the two other articles Get Started with Lua - Bounces Additions to Lua and Get Started with Lua - Bounces Native Bridge describe additions to the language specific to Bounces.
- Lua 5.2 Reference Manual: the official Lua Reference Manual. Though it is clearly not a tutorial, it is interesting to read at least sections 1 - Introduction, 2.1 - Values and Types and 3 - The language to get
- Live code update is only one facet of Bounces. If you use storyboards in your iOS apps, live storyboard updates is also something you should check, starting with this Introduction to Dynamic Storyboard Updates.
- And more generally, Bounces documentation page is a good entry point for knowing more.
Post a Comment